|
|
Abstract
Clinical photography is the cornerstone of proper dermatological documentation
whether in case reports, for monitoring patients or for clinical trials
and research development. The most important factors to be considered for
good clinical photography are clarity and consistency which are achieved
via patient preparation, proper lighting and camera settings. Development
of new software and sophisticated systems has led to advanced collection
of qualitative as well as quantitative clinical data.
Introduction
Photography is accepted as the standard tool for documentation of dermatologic
conditions and treatment follow up in medical practice and research. With
the emergence of low-cost easy-to-use digital imaging systems, good-quality
photography has been made more accessible to practitioners. Primary concerns
are controlling lighting and positioning to provide a clear record of the
patients' skin condition and assure meaningful comparison of clinical end
points. Photography plays an important role in professional communications,
practice development, and medico-legal issues [1].
Applications of clinical photography
Documenting conditions and treatments
Photography provides a unique opportunity to document the patient's initial
presentation which represents a baseline to how the condition progresses
with treatment. Photographs taken over time, or at specific end points,
provide a medical record that enables clear communications with patients
regarding their progress and provides the practitioners with permanent documentation
of the efficacy of their treatments.
Monitoring of at- risk patients
For patients at risk for melanoma, total body photography, also known
as whole-body integumentary photography, provides the means of establishing
a baseline against which to evaluate changes in the patient's presentation.
The basis for this type of photography is a multisection template that divides
the body into discrete anatomical areas. This template defines a standardized
series of photographs that comprise a "Body Map," consisting of 25-30 photographs.
The body map defines both the area of the anatomy to be photographed and
the positioning, or pose of the subject for each picture.
Professional and business development
An archive of clinical images documenting your work can be a valuable
asset for your practice. For professional publications or presentations,
photography is indispensable. If your practice includes esthetic procedures,
clinical photography demonstrating the results can be used in marketing and promotional materials,
or simply arranged in a binder to show prospective patients[1].
Photographic Techniques [1]
The most important factors to be considered for good clinical photography
are clarity and consistency. Clarity requires that the feature of interest
is distinctly and correctly represented in the photography. While consistency
means that in any series of photographs, there are no variations introduced
by the photographic process itself. This assures that any differences observed
between photographs at different time points, or among different patients,
truly represent differences in the subject or procedural outcomes. The most
important factors to maintain clarity and consistency are as follows:
Patient preparation
The extent of patient preparation depends on the area of interest for
photography. Elimination of the influences of clothing, jewelry, makeup,
and hair style is mandatory to avoid distracting the viewer's attention.
For facial photography, washing the subject's face before photography is
important to remove make up and reduce the shininess caused by oily skin.
This assures accurate documentation of the skin condition. It is good practice
to wait a few minutes before taking the photograph as the temporary erythema
caused by the cleansing process itself can influence the skin's appearance,
use a black headband to keep the hair pulled back. Males should be clean-shaven
whenever possible. In facial photography, it's important that the patient
maintain a neutral relaxed expression, particularly if there is the need
to monitor the progression of a treatment over time. For most types of body
photography, it is desirable for the patients to remove their clothing or
cover it with a neutral drape or surgical gown. For full or half-body photography,
you can make the patient more comfortable by providing disposable modesty
garments.
Composition and distance
The best way to avoid unwanted elements in your photographs is to keep
them out of the picture in the first place. Careful framing, creative draping,
and the use of a solid-color background are easy ways to improve any clinical
photograph. Moving the camera close to the area of interest isolates it
from its surroundings while providing a more detailed picture [2].
Camera-to-patient registration
An important element in serial photography is repeatable patient positioning
in relation to the camera. Consistent camera-to-patient registration assures
that the photographs always represent exactly the same view of the subject.
For critical facial or other close-up photography, special devices are sometimes
employed to lock down the camera/subject geometry.
Lighting
Lighting determines how clinical features will be presented in the photograph
which is important when there is a need to document subtle changes in form
or surface texture. Light striking the skin at an angle, or obliquely, will
reveal contour, creases and texture far better than direct head-on, or axial,
illumination [3].
Choice for lighting
Small changes in lighting position can dramatically influence the photographic
record of a treatment. The result can be false appearance of improvement
in the patient's condition or mask the results of successful treatment.
Camera settings
The controls on modern digital cameras can seem bewildering. For everyday picture taking, there is usually an "Auto" mode that overrides all the
other controls. Clinical photography requires a higher level of control.
The following is a guide to those that are most important to clinical quality
photography.
Exposure:
Cameras control exposure through a combination of lens aperture and shutter
speed. Shutter speed is important to minimize the effect of subject movement,
while aperture controls depth of field. Therefore, set the exposure control
to "Aperture Priority" or "Manual" and set a higher aperture number. This
will assure maximum sharpness in your photographs.
Focus:
Autofocus systems identify a target area in the subject and set the focus
to that distance. With a PAS camera, this area is identified with an illuminated
box on the camera's display. Always be sure this box covers the clinical
feature you want to photograph. To assure proper focus, depress the shutter
release halfway and wait for the focus confirmation before taking the picture.
White Balance:
Digital cameras achieve natural-looking color by adjusting to the external
light source illuminating the subject. This adjustment, called "White Balance,"
can be set automatically or by selecting from a menu of lighting options.
Most cameras also provide the ability to lock in a custom, or preset, white
balance that matches your shooting environment. This option assures the
greatest color accuracy and consistency over time.
Resolution:
Resolution is the number of pixels that a camera uses to create the image.
Usually, this is controlled by a "Quality" or "Image size" setting on the
camera. To use the full resolution of a camera, be sure this is set to the
highest quality or largest image size available. This will assure the greatest
possible detail in your photographs.
Background:
The photograph background must be plain and simple. Distracting backgrounds have a negative effect on the clarity of the clinical image. One of the
best backgrounds to use is a medium-blue felt material, as this provides
a pleasing contrast with skin tones and resists wrinkling. Other excellent
choices would be rolled paper background systems.
Medical Imaging Software
Allows the user to transfer photos from the camera to a computer, organize
them on a hard drive and usually adjust, modify, and print pictures as desired.
Many software applications allow you to tether the camera to the computer
so you can use the computer to control the camera and capture images directly
into the patient's chart. Other applications provide presentation tools,
pan and zoom controls for close examination of clinical features, and printing
templates. The ability to position 2 pictures side by side, or to overlay
them, is particularly useful for comparing before and after image captures
(Fig 1) [4].
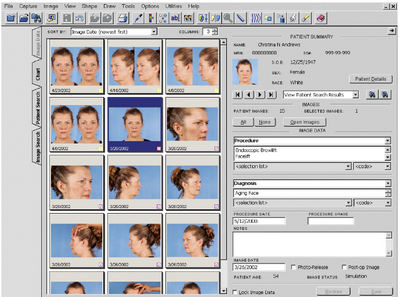 | Fig 1: Medical imaging software combines a searchable database with image
management tools [1] |
|
Imaging Systems used in dermatology practice
The following systems described later are available and are used frequently
in dermatology practices
Facial Devices
These devices are dedicated for practices that specialize in facial treatments.
They use a chin cup at a fixed distance from the camera to assure optimal,
and repeatable, facial positioning. Lighting units are fixed in relation
to the face. A number of these devices are available with a software application
to control image capture and database management (Fig 2) [1].
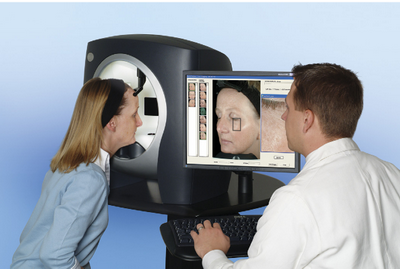 | Fig 2: A specialized facial imaging system with multiple lighting modes
and image analysis software [1] |
|
3-Dimensional (3-D) Systems
3-D imaging has proven to be valuable in documenting a wide range of
dermatologic procedures. 3-D systems can quantify changes in morphology
over time or resulting from treatment. Pre- and post procedure images can
be registered to provide a visual comparison [5]
Lighting Systems
The choice of lighting systems should be guided by the anatomical area
and the skin condition that you need to photograph.
Camera-Mounted Flash Systems
Particularly useful for close-up photography. A ring-light configuration
is well suited for intraoral applications, whereas the point-flash systems
provide better illumination for skin surfaces and texture.
Studio Lighting Systems
These lights can be positioned exactly as needed and offer variable power
settings for complete control over the lighting situation. These systems
produce excellent clinical photographs and allow highly repeatable serial
imaging.
Special-Purpose Systems
UV systems are useful for imaging subsurface pigmentation (melanin) or
features, such as porphyrins, which fluoresce under this type of illumination.
Digital cameras are largely insensitive to the UV illumination itself, but
the visible fluorescence of collagen and the UV absorption of melanin enable
the camera to image pigment clusters and lesions
Patient-Positioning Systems
The patients position itself can influence the appearance of the feature
being photographed for example facial wrinkles or skin laxity severity may
change dramatically with the position of the patient's head and neck, as
well as the facial expression. A natural relaxed position is desirable because
that more closely represents the typical appearance of your patient. The
visual improvement can be lost if there is a mismatch in positioning of
the before and after pictures.
Dermatoscopic Systems
These systems are composed of a dermoscopy device coupled with camera.
Canfield system
A cone-shaped attachment with removable contact glass enables repeatable
epiluminescent photography at a fixed reproduction ratio. Attachments are
also now available for smart phones that use their built-in cameras and
displays to provide a type of digital dermatoscope which is able to view
and capture highly-magnified images of individual lesions or areas of interest.
The images can be stored in the smart phone's memory, exported to an external
database, or telecommunicated to remote locations (Fig 3) [1].
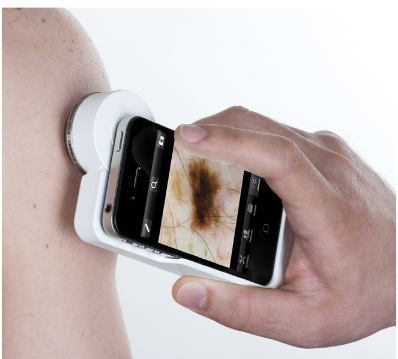 | Fig 3: The Canfield DermScope [1] |
|
Total body mapping
Total body mappingis the process of photographing the entire body to
record the location of moles and other pigmented lesions (Fig 4). If body
mapping is repeated at regular intervals, it can be a valuable way of detecting
new or changing lesions[6]. Sophisticated
digital mole mapping programmes may include the following:
- Risk evaluation i.e. age, medical and family history, skin typing,
sun exposure.
- Patient education regarding sun protection, moles and melanoma.
- Skin examination by a health professional (usually a doctor or specially
trained nurse)
- High quality digital images (photographs taken with a digital camera)
- Standardized poses of the whole body, with lesions of concern carefully
localized (this can require very accurate positioning and sophisticated
computer programming if there are several similar moles in close proximity).
- Close-up macro images of the lesions of concern.
- Dermoscopic images of lesions of concern.
- Evaluation of the images by an expert in skin cancer.
- A report to the patient and/or referring health practitioner including
suspected diagnoses and recommendations for treatment of lesions of concern.
- Follow-up mole mapping in 3 to 6 months for lesions of concern that
do not reach the threshold for excision.
- Follow-up mole mapping of all imaged lesions at intervals of 1 to 2
years or as recommended by your doctor.
- A secure database and transfer system to store the images and reports.
- Copies of the images for the patient or doctor to aid in self skin
examination.
The patient will be asked to remove at least outer clothing. Let the
staff know if you feel uncomfortable, especially if there are lesions of
concern hidden by your underwear. Make-up, nail varnish and jewellery should
be completely removed prior to the procedure. Long hair should be tied up[7].
 | Fig 4: The body map defines the anatomical area and subject positioning
for each photograph [1]. |
|
List of Indications:
- Fast detection of new or clinically changing melanocytic lesions.
- The first step in "Two-Step method of digital follow-up". Where the
total body imaging is then followed by dermoscopy of the highly suspicious
lesions [7]
- Early diagnosis of malignant skin lesion.
- Avoiding multiple excisions in at risk patients.
- Monitoring of patients of
- Personal history.
- Familial history.
- Dysplasticoratypicalnaevi.
- The use of digital imaging as a whole has enabled the use of telemedicine.
The procedure:
The process involves taking a series of photographs (usually about ten)
of the whole body, from head to toe from all sides ensuring that the areas
with the most moles are included. For optimal comparability with the repeated
images, the recording of the images is software controlled with reproducible
camera parameters.These photographs are stored using a special software,
which has the ability to track changes in colored skin lesions over time,
identify new lesions or significant changes to existing lesions. [8]
Sequential dermoscopic follow up is of great benefit when associated
with total body mapping. A prospective long-term study was done to suggest
a follow up plan of: (a) short-term follow-up of 3 months for patients with
familial atypical mole and melanoma syndrome and (b) long-term follow-up
of 6-12 months for those with atypical mole syndrome. Patients with multiple
common nevi and no additional risk factors were found to have low benefit
from sequential digital dermoscopy [9].
The automated mole mapping process is not a substitute for a full body
skin examination performed by an experienced doctor. Nor is it a substitute
for patient education to conduct self-examination. But used in conjunction
with these other methods it could increase the detection of potentially
dangerous skin lesions [6].
Advantages of Total Body Mapping:
TBM, if a fast non invasive method, and together with dermoscopy it is
the earliest method to detect suspicious lesions. Compared to self-skin
examination or an examination by a non-specialist doctor, mole mapping as
described above has the following advantages:
- The record can be used to determine whether a lesion of concern is
new or has changed.
- If the doctor determines that a lesion has the criteria for removal,
this can be done at the earliest possible stage, reducing the risk of melanoma
and minimizing surgery.
- If a lesion is new or has changed, but does not reach the threshold
for removal, it can be re-imaged and watched carefully.
- Lesions that don't have structural disorder and have not changed are
very unlikely to be melanoma so may not need to be removed, reducing the
potential cost, risks and complications of surgery.
- Digital mole mapping may be undertaken near where you live, reducing
the need to visit a dermatologist at a remote centre.
- Earlier expert evaluation .
- Reassurance to the patient and their health practitioner(s).
What are the risks of mole mapping?
Mole mapping is a relatively new procedure and is considered experimental
by many dermatologists, as it has not yet been proven to save lives. Like
all screening systems and other medical procedures, mole mapping is not
without risks.
- There may be a melanoma in a hidden site that has not been imaged,
such as the scalp or genitals.
- Early melanoma may look like a normal mole or other benign skin lesion
and might be missed (false negative).
- A harmless lesion may be misdiagnosed as melanoma, resulting in unnecessary
surgery and alarm (false positive).
- Melanoma may grow rapidly, particularly nodular melanoma; it may reach
a dangerous size before the next planned visit for mole mapping.
- Non-pigmented skin lesions are often imaged during a mole mapping.
These include skin cancers: amelanotic melanoma, basal cell carcinoma (BCC)
and squamous cell carcinoma (SCC). At times, pink or scaly skin cancers
may be difficult to distinguish from harmless lesions, as the photographic
appearance may be identical.
- The procedure may be embarrassing and/or expensive [10].
References
1. Witmer W K, Lebovitz P J. Clinical photography in the
dermatology practice. In Seminars in cutaneous medicine and surgery, 2012,
September 31(3): 191-199.
2. Pak H S, Lappan C M. Basic guide to dermatologic photography,1999.
Walter Reed Army Medical Center.
3. DiBernardo B, Pozner J, Codner M A. Techniques in Aesthetic
Plastic Surgery Series: Lasers and Non-Surgical Rejuvenation, 2009. England,
UK.
4. Rigel D S, Robinson J K, Ross M I, Friedman R, Cockerell
C J, Lim H, Stockfleth E. Cancer of the Skin: Expert Consult, 2011. Elsevier
Health Sciences.
5. Oliveria S , Satagopan J M, Geller A C, Dusza S W, Weinstock
M A, Berwick, M, .and Halpern A C. Study of Nevi in Children (SONIC): baseline
findings and predictors of nevus count. American journal of epidemiology,
2009,169(1): 41-53.
6. Molescreen Skin Cancer Clinic. Total body mapping. [Online].
2012-2014 Available from: http://www.molescreenaustralia.com.au/tbm.
7. Salerni G, Carrera C, Lovatto L, Puig-Butille J A, Badenas
C, Plana E, Malvehy J. Benefits of total body photography and digital dermatoscopy
("two-step method of digital follow-up") in the early diagnosis of melanoma
in patients at high risk for melanoma. Journal of the American Academy of
Dermatology, 2012. 67(1), e17-e27.
8. Kardorff, Bernd. Selbstzahlerleistungen in der Dermatologie
und der ?sthetischen Medizin. Berlin, Heidelberg: Springer, 2005.
9. Haenssle HA, Korpas B, Hansen-Hagge C, Buhl T, Kaune
KM, Johnsen S, Rosenberger A, Sch?n MP, Emmert S: Selection of patients
for long-term surveillance with digital dermoscopy by assessment of melanoma
risk factors. Arch Dermatol, 2010 146: 257-64.
10. IMI National Guidelines for Mole Mapping Photography,
previously accessed from http://www.imi.org.uk/guidelines/IMINatGuidelinesMoleMappingJuly2006.pdf© 2015 Egyptian Dermatology Online Journal
|
